Somewhere between building Rosemary Thyme, taking care of home, and simply keeping up with everyday life, I realized something.
I had stopped reading.
Not because I stopped loving books. I love to read. But reading is one of those quiet pleasures that is so easy to put aside when life gets busy.
So I’ve decided to bring my book back to the bedroom.
Nothing complicated. No reading challenge. No goal for how many books I need to finish this year.
Just a book beside the bed and a little promise to myself:
Phone down. Book open. Day over.
Maybe I’ll read a few chapters. Maybe I’ll only make it through a few pages before my eyes start getting heavy. And honestly, that’s part of the plan. 😂
There is something wonderfully old-fashioned about ending the day with a book instead of a screen.
And perhaps that’s part of falling in love with home again, too—not always adding something new, but rediscovering the simple things we once loved and somehow stopped making time for.
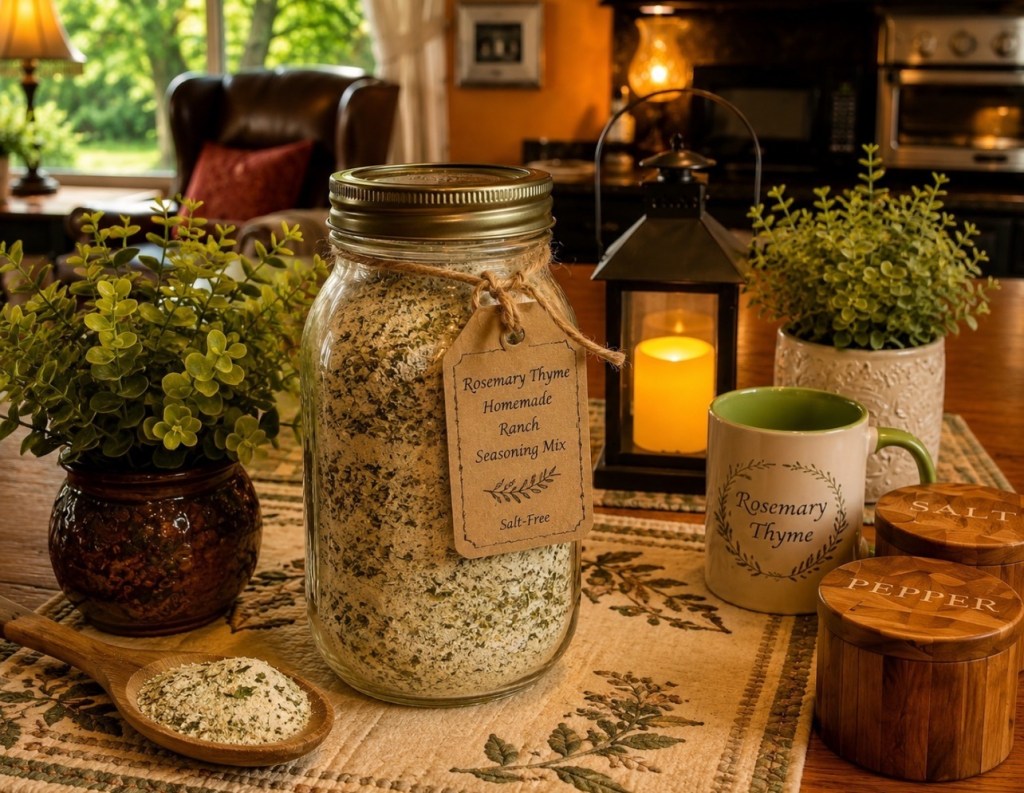
I love having homemade seasoning blends tucked into the pantry, ready whenever I need them. This homemade ranch mix uses organic buttermilk powder and plenty of herbs for that familiar ranch flavor — but I leave the salt out completely so I can control the sodium in whatever I’m making.
Add all of the ingredients to a bowl and whisk until thoroughly combined.
For a finer ranch-seasoning texture, pulse briefly in a small food processor or spice grinder.
Transfer the mixture to a clean, dry airtight jar.
Label and date the jar, and store according to the directions on your buttermilk powder package.
To Use
Start with about 2 tablespoons in place of one standard packet of ranch seasoning and adjust to taste.
Use it for homemade ranch dressing and dips, roasted vegetables, potatoes, chicken and so much more. And because there’s no salt added to the mix, you get to decide exactly how much goes into your finished dish. 🌿
If you like this recipe, please click Like and leave me a comment! I’d love to know how you would use your homemade ranch seasoning. 💛
The Rosemary Thyme Table Fall in Love with Home Again. 🌿🏡
The tomato harvest has officially made its way from the garden to the kitchen! 🍅
After watching trays of garden tomatoes slowly ripening on the Rosemary Thyme Table, I knew some of them were destined for a pot of homemade tomato soup.
This version is simple, wholesome and made without cream. Roasting the tomatoes first brings out their natural sweetness, while carrots add a little extra body and help balance the acidity. I use no-salt-added chicken broth so I can control the sodium, too.
And since Dennis avoids onion and garlic, I can simply leave those out. There is still plenty of wonderful flavor from the roasted tomatoes and herbs. 🌿
Roasted Garden Tomato Soup
Ingredients • 3 lbs ripe garden tomatoes, quartered • 2 tbsp extra-virgin olive oil • 2 medium carrots, sliced • 1 medium onion, chopped — optional • 3–4 garlic cloves — optional • 2 cups no-salt-added chicken broth, plus more if needed • 1 tsp dried basil or 1 tbsp fresh basil • 1 tsp dried thyme or several fresh thyme sprigs • ½ tsp dried oregano — optional • ¼ tsp black pepper • 1 tsp honey or preferred sweetener — optional • 1–2 tsp fresh lemon juice • Salt, only if desired after tasting
Directions
1. Roast the vegetables. Heat oven to 425°F. Place tomatoes and carrots on a large rimmed baking sheet along with the onion and garlic, if using. Drizzle with olive oil and toss gently.
Roast for 35–45 minutes, until the tomatoes have collapsed and the edges begin to caramelize. Save every bit of those wonderful juices!
2. Simmer. Transfer the roasted vegetables and juices to a soup pot. Add 2 cups chicken broth, basil, thyme, oregano and black pepper.
Simmer gently for about 15 minutes.
3. Blend. Puree with an immersion blender until smooth. Add a little additional broth if you’d like a thinner soup.
4. Finish. Stir in the fresh lemon juice and taste. If your tomatoes are particularly tart, add just a little honey or sweetener to round out the flavor.
No cream needed—the roasted vegetables make this soup beautifully smooth all on their own. 🍅🥣
And perhaps the best part? It freezes beautifully. I’m planning to tuck some away so we can enjoy a little taste of our summer garden when the cold days arrive. 🍂❄️
From garden to table…and a few bags into the freezer. That’s my kind of harvest. 🌿🍅💛
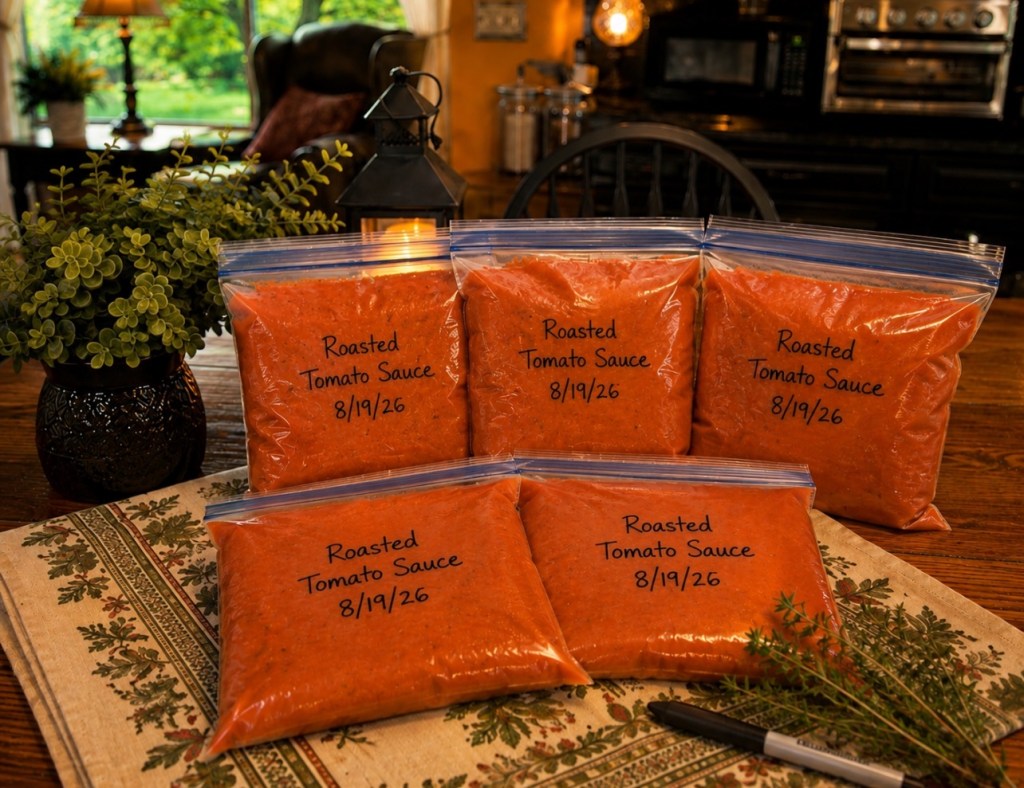
🍅 Roasted Garden Tomato Sauce — From the Garden to the Freezer 🌿
One of my favorite things to make with an abundance of garden tomatoes is homemade roasted tomato sauce.
And I don’t think of tomato sauce as something that’s only for pasta! I freeze mine in portions and use it all winter long in everything from chili and soups to stews, casseroles, pizza and so many of our everyday meals.
Roasting the tomatoes first concentrates their flavor and gives the sauce a wonderful richness. I add olive oil and plenty of Italian herbs—and whether my tomatoes are particularly acidic or not, I almost always add a little honey. 🍯😀 I love the subtle balance it gives the tomatoes.
You can blend this sauce until it’s beautifully smooth or leave it a little chunky and rustic. And there’s no peeling or seeding tomatoes around here! 😂
🍅 Roasted Garden Tomato Sauce
Ingredients • 5 lbs ripe garden tomatoes • 2 Tbsp extra-virgin olive oil • 1 tsp dried basil • 1 tsp dried oregano • ½ tsp dried thyme • ½ tsp dried rosemary, crushed • ½ tsp dried parsley • ¼ tsp black pepper • ½ tsp kosher salt, optional • 1 tsp honey 🍯 • Fresh basil or parsley, optional • ½ onion and 3–4 garlic cloves, optional
Directions
Heat oven to 425°F. Wash and core the tomatoes. Quarter large tomatoes and halve smaller ones.
Arrange on rimmed baking sheets. Drizzle with olive oil and sprinkle with the Italian herbs and black pepper. Add onion and garlic if desired.
Roast for 40–55 minutes, or until the tomatoes are very soft, lightly caramelized and some of their liquid has cooked away.
Transfer the tomatoes and all those wonderful roasting juices to a Dutch oven or large saucepan.
For a chunky sauce, mash or briefly blend with an immersion blender. For a smooth sauce, blend thoroughly.
Simmer uncovered over low heat for 15–30 minutes, until the sauce reaches the thickness you like.
Stir in the honey, taste and adjust the seasonings. Finish with fresh basil or parsley if you’d like.
Cool and freeze in meal-size portions. I like 2-cup portions because they’re so easy to grab whenever a recipe needs tomato sauce.
There is something awfully satisfying about reaching into the freezer in the middle of winter and pulling out a little taste of last summer’s garden. 🍅🌿❄️
Helene Rosemary Thyme 🌿😊 Fall in Love with Home Again 💛🏠
There is something especially satisfying about walking
out to the garden, picking ripe tomatoes, and turning them into something delicious for the table.
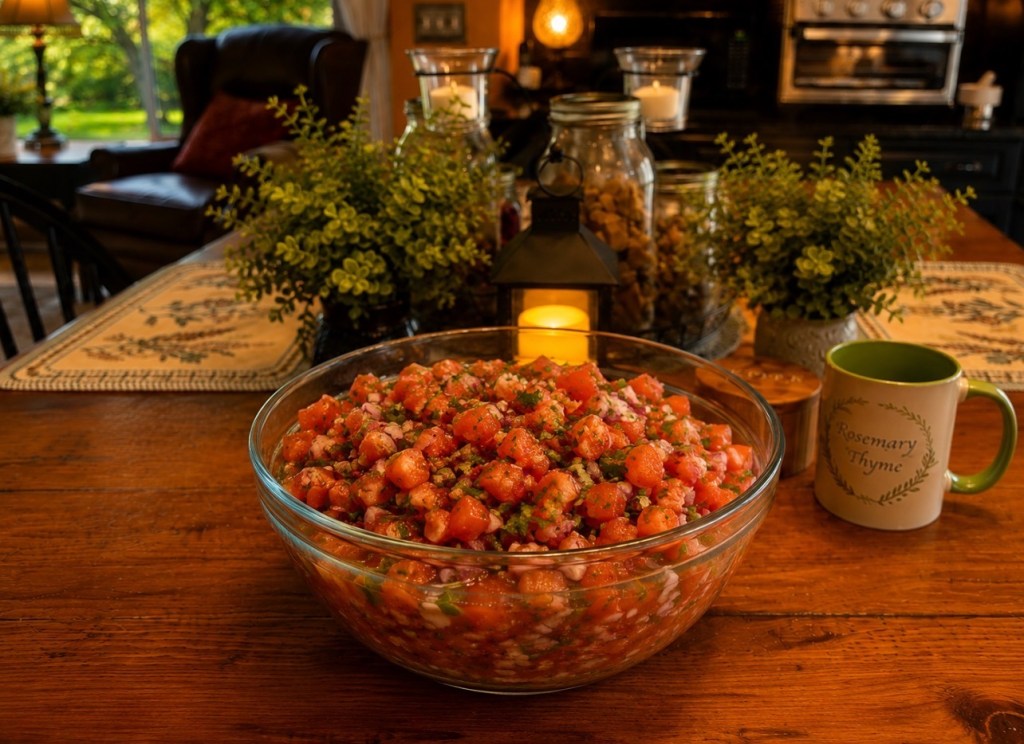
Today, those beautiful garden tomatoes became Fresh Garden Tomato Salsa—bright, simple and full of fresh summer flavor. And there’s no need to peel the tomatoes!
Fresh Garden Tomato Salsa
Ingredients
* 4 cups fresh garden tomatoes, diced
* ¼ cup finely diced red or sweet onion, optional
* 1 small garlic clove, finely minced, optional
* ¼ cup chopped fresh cilantro
* 2 tablespoons fresh lime juice
* 1 tablespoon fresh lemon juice
* ½ teaspoon ground cumin
* ¼ teaspoon salt, or to taste
* ½ teaspoon honey or sweetener, optional
* 1 small jalapeño, seeded and finely minced, optional
* 2 tablespoons sliced scallion greens or fresh chives, optional
Directions
1. Dice the tomatoes and place them in a colander for 10–15 minutes if they are especially juicy.
2. Combine the tomatoes, cilantro, lime juice, lemon juice, cumin and salt.
3. Add the onion, garlic and jalapeño if you like them—or use scallion greens or fresh chives for a gentler flavor.
4. Taste the salsa. If your tomatoes are a little tart, add just a touch of honey or your favorite sweetener.
5. Refrigerate for about 30 minutes before serving to give all those fresh flavors a chance to come together.
Serve it with tortilla chips, spoon it over grilled chicken or fish, add it to tacos and burritos—or just grab a chip and enjoy it straight from the bowl.
Fresh garden tomatoes really don’t need much help. Sometimes the simplest recipes are the ones that taste the most like summer.
If you enjoy easy homemade recipes like this one, please give it a and leave me a comment. I love hearing from you!
🦋 The Rosemary Thyme Butterfly Nursery — A New Generation 🌿
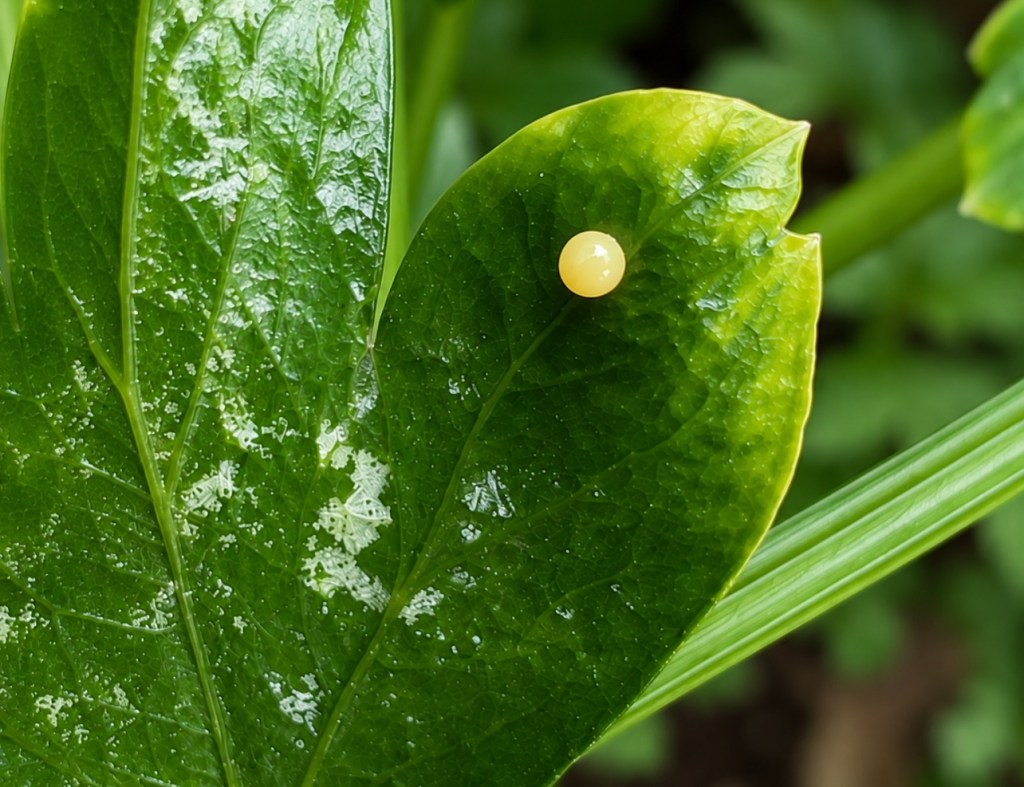
Today, a beautiful female black swallowtail came fluttering into the Rosemary Thyme garden.
I watched her moving quickly from plant to plant and wondered if she might be looking for a place to lay her eggs.
So after she flew away, I went looking.
And there they were. 💛
One tiny pearl-like egg…then another…and another.
Four so far! 🦋
Earlier this summer, we watched black swallowtail caterpillars make their home among the herbs. They ate, grew, and eventually disappeared to begin their remarkable transformation.
Could today’s visitor have been one of those little caterpillars returning to the garden where her own story began? There’s no way to know for certain.
But I like to think it’s possible. 💛
And now, tucked among the green leaves, another generation is beginning.
I’ll be watching these four tiny eggs closely and sharing their journey as they hatch, grow, and — hopefully — someday spread their own wings.
There is something even more remarkable about watching these black swallowtails when you realize how quickly their little lives unfold. 🐛🌿🦋 After hatching from a tiny egg, a black swallowtail spends roughly two to four weeks as a caterpillar, eating, growing, and shedding its skin several times along the way. Then, when it is finally ready, it does something that had me wondering where all of my caterpillars had gone—it simply wanders away from the parsley and herbs in search of a safe, sheltered place to form its chrysalis.
Me: “Where are you going?” Caterpillar: “I’d rather not say.” 😂🐛 And then… 🦋
In warm summer weather, it will usually remain tucked inside that chrysalis for about 10 to 20 days before emerging as a beautiful butterfly. And perhaps the most bittersweet part is that the adult butterfly generally has only two to four weeks to flutter among the flowers, drink nectar, find a mate, and begin the whole cycle again. Knowing that makes those few minutes when one visits the garden feel even more precious. What looked like a simple butterfly stopping by was actually one small chapter in an extraordinary transformation I was lucky enough to witness right here at home. 🌿🦋💛
The Rosemary Thyme Butterfly Nursery is officially open again. 🦋🌿💛
Rosemary Thyme Table – Fall in Love with Home Again.
🍅🌿 Another Delicious Way to Use Those Garden Tomatoes!
If your garden is giving you tomatoes faster than you can use them, here is one more cozy, easy dinner idea for the list: Italian Tomato & Provolone Spaghetti Squash.
One of my favorite little kitchen tricks with spaghetti squash is to pierce it first and microwave it for 3–5 minutes before cutting it in half. It softens that hard outer shell just enough to make slicing it much easier.
Italian Tomato & Provolone Spaghetti Squash
Ingredients
1 medium spaghetti squash
1½–2 cups cherry tomatoes, halved
1 tablespoon olive oil
1 teaspoon Italian seasoning
Black pepper, to taste
½ cup shredded or chopped provolone cheese
¼ cup grated Parmesan cheese
Fresh basil or parsley, for serving
Directions
Preheat oven to 400°F.
Pierce the spaghetti squash several times and microwave for 3–5 minutes. Let it cool briefly, then carefully cut it in half lengthwise and scoop out the seeds.
Brush the squash lightly with olive oil and season with Italian seasoning and black pepper.
Divide the cherry tomatoes between the squash halves and drizzle with a little olive oil.
Roast, cut-side up, for 35–45 minutes, or until the squash is tender and the tomatoes are soft and beginning to burst.
Use a fork to gently loosen the squash into strands and stir the roasted tomatoes through them.
Top with provolone and Parmesan.
Return to the oven for another 8–10 minutes, until the cheese is melted and bubbly. For a little extra browning, place it under the broiler for a minute or two.
Finish with fresh basil or parsley and a small drizzle of olive oil.
The melted provolone makes this feel wonderfully comforting, while the fresh tomatoes keep it light and summery. And best of all, it gives me one more way to enjoy those beautiful tomatoes coming out of the garden! 🍅💛
Helene Rosemary Thyme 🌿😊 Fall in Love with Home Again 💛🏠
A cold front moved through yesterday, and this morning the sky was cloudy and gray with that unmistakable coolness in the air. The very first thing I thought of was soup.
I opened my freezer to see what I had on hand and found bags of carrots, sweet potatoes, and butternut squash waiting to be used. With a carton of unsalted chicken broth in the pantry and a few herbs from the spice cabinet, a pot of soup was soon simmering away in the slow cooker.
There is something comforting about using simple ingredients you already have and turning them into something warm and nourishing. As the soup cooked, the house filled with the cozy aroma of sweet vegetables, thyme, and ginger. By lunchtime, it had become the most delicious bowl of creamy soup—perfect for a cool day at home.
Sometimes the best meals aren’t the ones we plan. They’re the ones that come together from what we already have, with a little creativity and a grateful heart.
1. Add the squash, sweet potatoes, carrots, broth, olive oil, thyme, ginger, pepper, and bay leaf to a slow cooker.
2. Cook on LOW for 6–8 hours or HIGH for 3–4 hours.
3. Remove the bay leaf.
4. Blend until smooth using an immersion blender, or carefully blend in batches.
5. Stir in the lemon juice and the Greek yogurt or cottage cheese if using.
6. Add additional broth if needed to reach your desired consistency.
Serve warm with crusty bread or a simple salad.
Blessing
May we never overlook the simple blessings waiting in our pantry, freezer, and home. May every warm bowl shared around the table bring comfort, gratitude, and peace to those we love. Amen.
I cook soups all year round. Since most of my soups are made in the slow cooker, I don’t have to worry about heating up the kitchen, even during the summer months. They’re also one of my favorite ways to add extra vegetables to our meals.
This soup combines tender chicken meatballs, kale, spinach, carrots, celery, and just enough couscous to make it hearty without being heavy. A squeeze of fresh lemon at the end brightens the entire pot and gives it a fresh garden flavor.
Tomorrow our son will be out with friends enjoying a new hot chicken restaurant that recently opened nearby. It seems those places are becoming more popular every day, and I’m sure he’ll have a wonderful time.
Meanwhile, here at home, the weather forecast is calling for rain and cooler temperatures.
So instead of a more elaborate Sunday dinner, Dennis and I will be enjoying something simple and comforting: a pot of Rosemary Thyme Corn & Butter Bean Chowder simmering on the stove.
There was a time when Sundays were filled with children’s schedules, busy kitchens, extra chairs around the table, and the wonderful noise of family life.
Now our Sundays are quieter.
And while I sometimes miss those busy years, I’ve also come to appreciate the blessings of this season.
A rainy afternoon.
A warm pot of soup.
A loaf of sourdough bread.
Conversation across the table.
The comfort of being with someone you’ve shared decades of life with.
The table may be smaller these days, but it has lost none of its meaning.
Rosemary Thyme Corn & Butter Bean Chowder
(Creamy • Comforting • Rainy-Day Favorite)
Servings: 6
Ingredients
• 1 tablespoon olive oil
• 1 medium onion, diced
• 2 celery stalks, diced
• 2 medium carrots, diced
• 2 cloves garlic, minced
• 2 (15-ounce) cans Eden Organic No-Salt-Added Butter Beans, drained and rinsed
• 3 cups corn kernels (fresh, frozen, or thawed)
• 4 cups no-salt-added vegetable broth
• 1 teaspoon dried thyme
• ½ teaspoon dried rosemary, crushed
• ½ teaspoon black pepper
• 1 bay leaf
• 1 cup half-and-half
• 1 tablespoon lemon juice
Directions
Heat olive oil in a large soup pot. Add onion, celery, and carrots and cook until softened, about 6–8 minutes.
Add garlic and cook 30 seconds.
Stir in butter beans, corn, vegetable broth, thyme, rosemary, black pepper, and bay leaf.
Bring to a gentle boil, reduce heat, and simmer for 20–25 minutes.
Remove the bay leaf.
Use an immersion blender to partially blend about one-third of the soup for a creamy chowder texture while leaving plenty of beans and corn intact.
Stir in half-and-half and lemon juice. Heat gently without boiling.
Serve with toasted sourdough bread and a sprinkle of fresh parsley or chives if desired.
One of the things I love most about butter beans is how they turn simple pantry ingredients into something that feels nourishing and special. They are creamy, filling, affordable, and one of the reasons I always keep a few cans on the shelf.
Sometimes happiness isn’t found in grand events or special occasions.
Sometimes it’s found in the simple gift of being home while the rain falls outside the window and supper quietly simmers on the stove.
May your kitchen be filled with simple meals, peaceful moments, and the quiet comfort of caring for the people you love one plate at a time.



 Fresh Garden Tomato Salsa


 and leave me a comment. I love hearing from you!





 Slow Cooker Creamy Carrot, Sweet Potato & Butternut Squash Soup
 Blessing
 Helene
 Rosemary Thyme


 Slow Cooker Couscous Chicken Meatball Soup
 Rosemary Thyme Tip:

 Rosemary Thyme

 Rosemary Thyme Corn & Butter Bean Chowder
 Heat olive oil in a large soup pot. Add onion, celery, and carrots and cook until softened, about 6–8 minutes.
 Add garlic and cook 30 seconds.
 Stir in butter beans, corn, vegetable broth, thyme, rosemary, black pepper, and bay leaf.
 Bring to a gentle boil, reduce heat, and simmer for 20–25 minutes.
 Remove the bay leaf.
 Use an immersion blender to partially blend about one-third of the soup for a creamy chowder texture while leaving plenty of beans and corn intact.
 Stir in half-and-half and lemon juice. Heat gently without boiling.
 Serve with toasted sourdough bread and a sprinkle of fresh parsley or chives if desired.
 May your kitchen be filled with simple meals, peaceful moments, and the quiet comfort of caring for the people you love one plate at a time.


